基于 NiN 的 Fashion-MNIST 服饰分类

介绍

环境准备

使用到的库:

  • Pytorch
  • matplotlib
  • d2l

d2l 为斯坦福大学李沐教授打包的一个库,其中包含一些深度学习中常用的函数方法。

安装:

1
2
pip install matplotlib
pip install d2l

Pytorch 环境请自行配置。

数据集介绍

Fashion-MNIST 是一个替代 MNIST 手写数字集的图像数据集。 它是由 Zalando(一家德国的时尚科技公司)旗下的研究部门提供。其涵盖了来自 10 种类别的共 7 万个不同商品的正面图片。
Fashion-MNIST 的大小、格式和训练集/测试集划分与原始的 MNIST 完全一致。60000/10000 的训练测试数据划分,28x28 的灰度图片。你可以直接用它来测试你的机器学习和深度学习算法性能,且不需要改动任何的代码。
Fashion-MNIST

下载地址:
本文使用 Pytorch 自动下载。

网络模型介绍

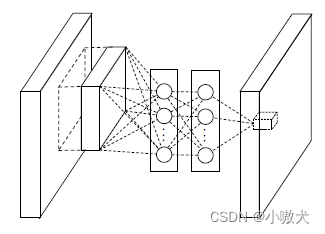
Network In Network (NIN) 是由 Min Lin 等人于 2014 年提出,在 CIFAR-10 和 CIFAR-100 分类任务中达到当时的最好水平,其网络结构是由三个多层感知机(NiN 块)堆叠而成。NiN 模型论文 《Network In Network》 发表于 ICLR-2014,NIN 以一种全新的角度审视了卷积神经网络中的卷积核设计,通过引入子网络结构代替纯卷积中的线性映射部分,这种形式的网络结构激发了更复杂的卷积神经网络的结构设计,GoogLeNetInception 结构就是来源于这个思想。结构图如下:
NiN

NiN 块:
NiN块


导入相关库

1
2
3
4
5
6
import torch
from torch import nn
from torchvision import datasets, transforms
from torch.utils.data import DataLoader
import matplotlib.pyplot as plt
from d2l import torch as d2l

定义 NiN 网络结构

1
2
3
4
5
6
7
8
9
10
11
12
13
14
15
16
17
18
19
20
def nin_block(in_channels, out_channels, kernel_size, strides, padding):
# 定义NiN块
return nn.Sequential(
nn.Conv2d(in_channels, out_channels, kernel_size, strides, padding),
nn.ReLU(),
nn.Conv2d(out_channels, out_channels, kernel_size=1), nn.ReLU(),
nn.Conv2d(out_channels, out_channels, kernel_size=1), nn.ReLU())

# 定义NiN网络
net = nn.Sequential(
nin_block(1, 96, kernel_size=11, strides=4, padding=0),
nn.MaxPool2d(3, stride=2),
nin_block(96, 256, kernel_size=5, strides=1, padding=2),
nn.MaxPool2d(3, stride=2),
nin_block(256, 384, kernel_size=3, strides=1, padding=1),
nn.MaxPool2d(3, stride=2),
nn.Dropout(0.5),
nin_block(384, 10, kernel_size=3, strides=1, padding=1),
nn.AdaptiveAvgPool2d((1, 1)),
nn.Flatten())

下载并配置数据集和加载器

这里 NiN 输入图片尺寸应为 224*224,我们将 28*28Fashion-MNIST 图片拉大到 224*224

1
2
3
4
5
6
7
8
9
10
11
12
13
# 下载并配置数据集
trans = transforms.Compose([transforms.Resize((224, 224)), transforms.ToTensor()])
train_dataset = datasets.FashionMNIST(root=r'E:\Deep Learning\dataset', train=True,
transform=trans, download=True)
test_dataset = datasets.FashionMNIST(root=r'E:\Deep Learning\dataset', train=False,
transform=trans, download=True)

# 配置数据加载器
batch_size = 64
train_loader = DataLoader(dataset=train_dataset,
batch_size=batch_size, shuffle=True)
test_loader = DataLoader(dataset=test_dataset,
batch_size=batch_size, shuffle=True)

定义训练函数

训练完成后会保存模型,可以修改模型的保存路径。

1
2
3
4
5
6
7
8
9
10
11
12
13
14
15
16
17
18
19
20
21
22
23
24
25
26
27
28
29
30
31
32
33
34
35
36
def train(net, train_iter, test_iter, epochs, lr, device):
def init_weights(m):
if type(m) == nn.Linear or type(m) == nn.Conv2d:
nn.init.xavier_uniform_(m.weight)
net.apply(init_weights)
print(f'Training on:[{device}]')
net.to(device)
optimizer = torch.optim.SGD(net.parameters(), lr=lr)
loss = nn.CrossEntropyLoss()
timer, num_batches = d2l.Timer(), len(train_iter)
for epoch in range(epochs):
# 训练损失之和,训练准确率之和,样本数
metric = d2l.Accumulator(3)
net.train()
for i, (X, y) in enumerate(train_iter):
timer.start()
optimizer.zero_grad()
X, y = X.to(device), y.to(device)
y_hat = net(X)
l = loss(y_hat, y)
l.backward()
optimizer.step()
with torch.no_grad():
metric.add(l * X.shape[0], d2l.accuracy(y_hat, y), X.shape[0])
timer.stop()
train_l = metric[0] / metric[2]
train_acc = metric[1] / metric[2]
if (i + 1) % (num_batches // 30) == 0 or i == num_batches - 1:
print(f'Epoch: {epoch+1}, Step: {i+1}, Loss: {train_l:.4f}')
test_acc = d2l.evaluate_accuracy_gpu(net, test_iter)
print(
f'Train Accuracy: {train_acc*100:.2f}%, Test Accuracy: {test_acc*100:.2f}%')
print(f'{metric[2] * epochs / timer.sum():.1f} examples/sec '
f'on: [{str(device)}]')
torch.save(net.state_dict(),
f"E:\\Deep Learning\\model\\NiN_Fashion-MNIST_Epoch{epochs}_Accuracy{test_acc*100:.2f}%.pth")

训练模型(或加载模型)

如果环境正确配置了 CUDA,则会由 GPU 进行训练。
加载模型需要根据自身情况修改路径。

1
2
3
4
5
epochs, lr = 20, 0.1
device = torch.device("cuda:0" if torch.cuda.is_available() else "cpu")
train(net, train_loader, test_loader, epochs, lr, device)
# 加载保存的模型
# net.load_state_dict(torch.load(r"E:\Deep Learning\model\NiN_Fashion-MNIST_Epoch20_Accuracy89.41%.pth"))

可视化展示

1
2
3
4
5
6
7
8
9
10
11
12
13
14
15
16
17
18
19
20
21
22
23
def show_predict():
# 预测结果图像可视化
net.to(device)
loader = DataLoader(dataset=test_dataset, batch_size=1, shuffle=True)
plt.figure(figsize=(12, 8))
name = ['T-shirt', 'Trouser', 'Pullover', 'Dress', 'Coat',
'Sandal', 'Shirt', 'Sneaker', 'Bag', 'Ankle boot']
for i in range(9):
(images, labels) = next(iter(loader))
images = images.to(device)
labels = labels.to(device)
outputs = net(images)
_, predicted = torch.max(outputs.data, 1)
title = f"Predicted: {name[int(predicted[0])]}, True: {name[int(labels[0])]}"
plt.subplot(3, 3, i + 1)
plt.imshow(images.cpu()[0].squeeze())
plt.title(title)
plt.xticks([])
plt.yticks([])
plt.show()


show_predict()

预测图

结果来自训练轮数epochs=20,准确率Accuracy=89.41%NiN 模型:
预测图1
预测图2
预测图3