学习笔记 深度学习 基于 VGG-16 的 Fashion-MNIST 服饰分类 小嗷犬 2022-11-05 2023-08-25 介绍 环境准备 使用到的库:
d2l 为斯坦福大学李沐教授打包的一个库,其中包含一些深度学习中常用的函数方法。
安装:
1
2
pip install matplotlib
Pytorch 环境请自行配置。
数据集介绍 Fashion-MNIST 是一个替代 MNIST 手写数字集的图像数据集。 它是由 Zalando (一家德国的时尚科技公司)旗下的研究部门提供。其涵盖了来自 10 种类别的共 7 万个不同商品的正面图片。
Fashion-MNIST 的大小、格式和训练集/测试集划分与原始的 MNIST 完全一致。60000/10000 的训练测试数据划分,28x28 的灰度图片。你可以直接用它来测试你的机器学习和深度学习算法性能,且不需要改动任何的代码。
下载地址:
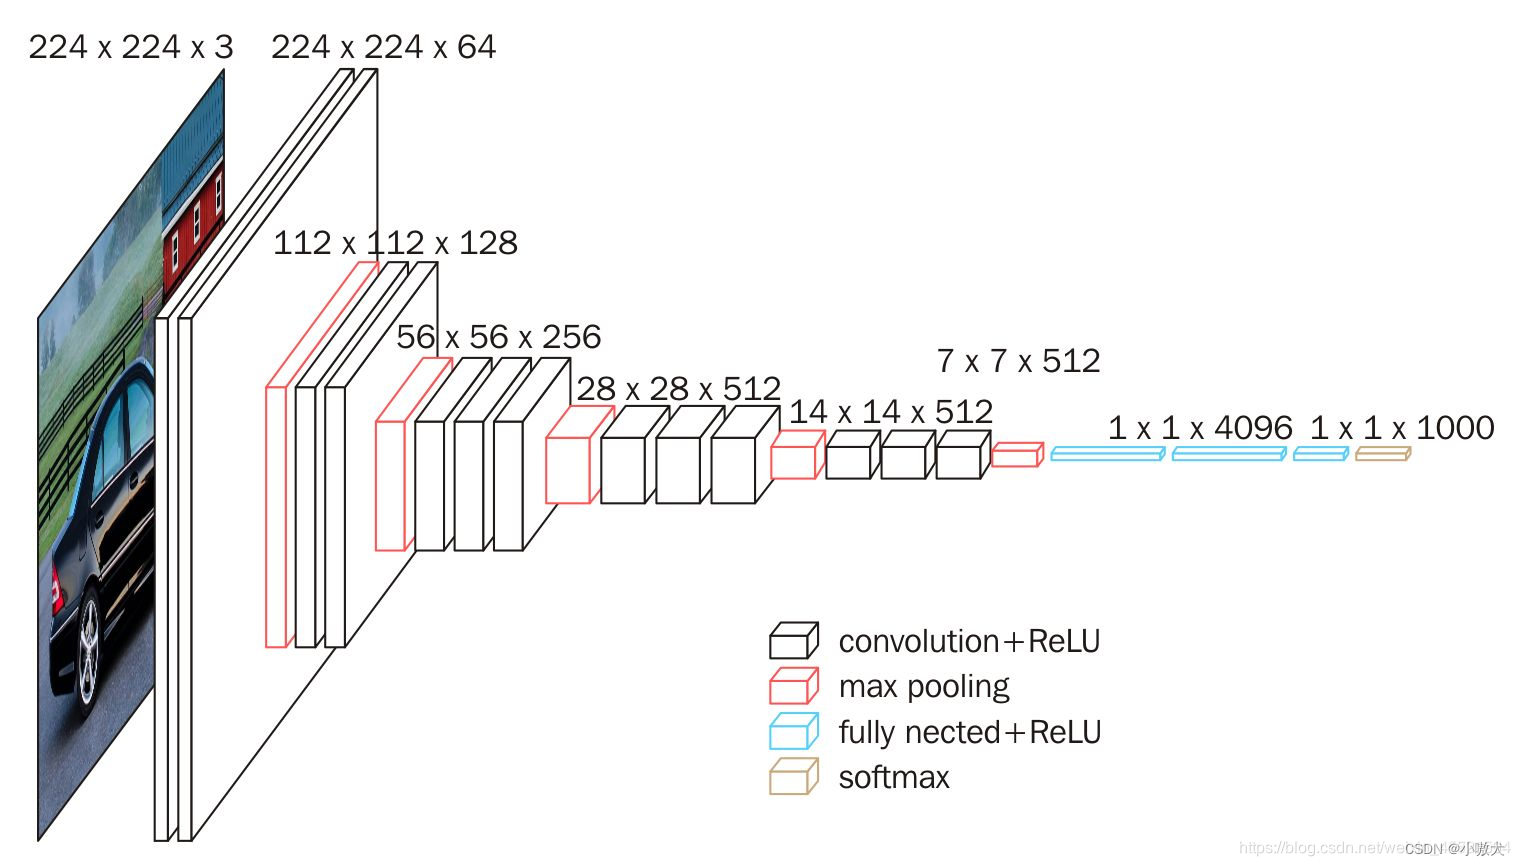
网络模型介绍 VGG-16 网络是 14 年牛津大学计算机视觉组和 Google DeepMind VGG-16 网络取得了 ILSVRC 2014 比赛分类项目的第 2 名,定位项目的第 1 名。VGGNet 网络结构简洁,迁移到其他图片数据上的泛化性能非常好。VGGNet 现在依然经常被用来提取图像特征,该网络训练后的模型参数在其官网上开源了,可以用来在图像分类任务上进行在训练,即:提供了非常好的初始化权重,使用较为广泛。结构图如下:
导入相关库 1 2 3 4 5 6 import torchfrom torch import nnfrom torchvision import datasets, transformsfrom torch.utils.data import DataLoaderimport matplotlib.pyplot as pltfrom d2l import torch as d2l
定义 VGG-16 网络结构 1 2 3 4 5 6 7 8 9 10 11 12 13 14 15 16 17 18 19 20 21 22 23 24 25 26 27 28 29 30 31 32 33 34 35 36 37 38 39 40 def vgg_block (num_convs, in_channels, out_channels ):""" Args: num_convs (int): 卷积层的数量 in_channels (int): 输入通道的数量 out_channels (int): 输出通道的数量 """ for _ in range (num_convs):3 , padding=1 ))2 , stride=2 ))return nn.Sequential(*layers)def vgg (conv_arch ):""" Args: conv_arch (tuple): 每个VGG块里卷积层个数和输出通道数 """ 1 for (num_convs, out_channels) in conv_arch:return nn.Sequential(7 * 7 , 4096 ), nn.ReLU(), nn.Dropout(0.5 ),4096 , 4096 ), nn.ReLU(), nn.Dropout(0.5 ),4096 , 10 ))2 , 16 ), (2 , 32 ), (3 , 64 ), (3 , 128 ), (3 , 128 ))
这里由于设备限制,笔者将各层网络的输出通道数将为了原来的 1/4 ,可以满足 Fashion-MNIST 的任务,降低了网络的复杂度。
下载并配置数据集和加载器 由于 VGG-16 是为处理 ImageNet 数据集设计的,所以输入图片尺寸应为 224*224,这里我们将 28*28 的 Fashion-MNIST 图片拉大到 224*224。
1 2 3 4 5 6 7 8 9 10 11 12 13 14 15 0 , transforms.Resize(224 ))'./dataset' , train=True ,True )'./dataset' , train=False ,True )64 True )True )
定义训练函数 训练完成后会保存模型,可以修改模型的保存路径。
1 2 3 4 5 6 7 8 9 10 11 12 13 14 15 16 17 18 19 20 21 22 23 24 25 26 27 28 29 30 31 32 33 34 35 36 def train (net, train_iter, test_iter, epochs, lr, device ):def init_weights (m ):if type (m) == nn.Linear or type (m) == nn.Conv2d:print (f'Training on:[{device} ]' )len (train_iter)for epoch in range (epochs):3 )for i, (X, y) in enumerate (train_iter):with torch.no_grad():0 ], d2l.accuracy(y_hat, y), X.shape[0 ])0 ] / metric[2 ]1 ] / metric[2 ]if (i + 1 ) % (num_batches // 30 ) == 0 or i == num_batches - 1 :print (f'Epoch: {epoch+1 } , Step: {i+1 } , Loss: {train_l:.4 f} ' )print (f'Train Accuracy: {train_acc*100 :.2 f} %, Test Accuracy: {test_acc*100 :.2 f} %' )print (f'{metric[2 ] * epochs / timer.sum ():.1 f} examples/sec ' f'on: [{str (device)} ]' )f"./model/VGG-16_Epoch{epochs} _Accuracy{test_acc*100 :.2 f} %.pth" )
5.训练模型(或加载模型)
如果环境正确配置了 CUDA,则会由 GPU 进行训练。
1
2
3
4
5
6
epochs, lr = 10 , 0.05 "cuda:0" if torch.cuda.is_available() else "cpu" )
可视化展示 1 2 3 4 5 6 7 8 9 10 11 12 13 14 15 16 17 18 19 20 21 22 23 def show_predict ():1 , shuffle=True )12 , 8 ))'T-shirt' , 'Trouser' , 'Pullover' , 'Dress' , 'Coat' ,'Sandal' , 'Shirt' , 'Sneaker' , 'Bag' , 'Ankle boot' ]for i in range (9 ):next (iter (loader))max (outputs.data, 1 )f"Predicted: {name[int (predicted[0 ])]} , True: {name[int (labels[0 ])]} " 3 , 3 , i + 1 )0 ].squeeze())
预测图 结果来自训练轮数epochs=10,准确率Accuracy=92.08%的 VGG-16 模型: